Showing posts with label gluten-free. Show all posts

Friday, November 19, 2010

Vegan MoFo Day 19: If you invited the Countess Wachtmeister to Thanksgiving...


Should you decide to invite the Countess Wachtmeister to your vegan Thanksgiving potluck, the approved method of communication is chanting the Stanzas of Dzyan at midnight, under a bright moon, while brandishing fungi. If she hears you and accepts, she might cruise in from the astral plane bearing her Sweet Potato Curry in ectoplasmic hands.

Just in case you prefer making it yourself to summoning dead Countesses, here is the recipe, veganized from her Practical Vegetarian Cookery (1897):

Peel and cube two large sweet potatoes. As you can probably tell from the first photo, I used white-fleshed Japanese s.p.s. Melt 2 T vegan margarine in a large skillet and add the sweet potatoes and some curry powder (amount and intensity to suit yourself). If you avoid margarine, coconut oil would be a good substitute. Fry the potatoes on medium heat until they begin to brown and are half-cooked. Add 2 c vegetable broth, salt (if the broth is not already loaded with it), and black pepper. Simmer until the broth reduces and the potatoes are soft.

The results are quite pleasant in their simplicity, although I am sure you could jazz it up. I'm surprised the Countess did not encase this in pie crust (as she was wont to do with most foods), as it would make a lovely filling for a savory pie.

Tuesday, November 16, 2010

Vegan MoFo Day 16: Soft-Curd, Fat-Free Soy Cheese


With a bit of fear in my heart, I decided to try a soft-curd soy cheese from Frank and Rosalie Hurd's Ten Talents (1968). Having had many negative (and some positive) soy cheese encounters, I was far from sure. My fears deepened when I realized I had only defatted soy flour on hand. Fat-free soy cheese? The chance of a nasty result loomed large.

I should not doubt Rosalie Hurd! This worked alarmingly well, and I will definitely make it again (and again, and again).

In a blender, mix a scant cup of soy flour (defatted works just fine!) and a quart of water until very well combined. The Hurds warn to stay on the scant side of a cup of soy flour. Apparently, if you get the liquid too thick, it will not curd. Pour the liquid into the top of a double boiler, and cook over boiling water for 20 minutes. Remove it from the heat, and immediately stir in 1/4 c fresh lemon juice and 3/4 t salt. Put the lid on the pot, and leave it alone for 20 minutes, during which it will curd.

Pour into a strainer lined with cheesecloth, and allow to drain until it is as dry as you like. After draining, I stirred in some granulated onion, granulated garlic, and smoked paprika. I can see many flavor experiments with this cheese. Try it!

Sunday, November 14, 2010

Vegan MoFo Day 14: Barbeque Limas


I've never been a lima hater, but I have had a lot of poorly prepared, mealy, flavorless limas. The Rosicrucian Fellowship's New Age Vegetarian Cookbook (1968) can fix your lima problems. The recipe required only the slightest veganization, and is pictured above with okra patties (recipe coming tomorrow).

Chop one small onion, and fry in 2 T olive oil until it starts to caramelize. (Next time, I'm adding a chopped jalapeno to the pan, too.) Mix with the following:

14 oz frozen limas (right out of the bag - no need to thaw)
8 oz tomato sauce
1 t prepared horseradish
1 t vegan Worcestershire sauce

(Next time, I will probably add 1 t brown sugar - or molasses or sorghum - and a few drops of liquid smoke.)

Pour everything into a casserole, dot the top with bits of vegan margarine (if you want), and bake uncovered at 325 F for 45 minutes to 1 hour, until it looks done.

Friday, November 12, 2010

Vegan MoFo Day 12: Mummy Food


Edgar Cayce (1877-1945) is a noted figure in the history of both alternative religion and alternative health. He's also a local boy, from just up the road in Hopkinsville, Kentucky. If life ever takes you to Hopkinsville, there is a wonderful Cayce exhibit at the Pennyroyal Area Museum. Cayce is buried in Hoptown - see photo above, which I took on a tour sponsored by the musuem.

Cayce was not a vegetarian, but his health recommendations indicated a diet primarily composed of fresh fruits, vegetables, nuts, and whole grains. He also advocated regular consumption of raw fruits and vegetables. By far, the most popular recipe from his work is "Mummy Food," so called as the formula was given to Cayce in a dream by an ancient Egyptian mummy in 1937. Top that, people. And it's vegan and gluten free.

Being a long-dead ancient Egyptian, the mummy did not provide exact measurements. The following recipe is what is usually given out:

1/2 c chopped dried dates
1/2 c chopped dried figs
1 heaping tablespoon cornmeal
1 1/2 c water

I think a sprinkle of salt is a nice addition, but it is not in the original formula. Anyhow, mix everything together, cover, and let it sit on the counter overnight. In the morning, bring it to a boil and let it simmer until it is done enough for you. I tend to follow the norm in cooking it for a long time - 45 minutes to 1 hour - but suit yourself.

Mummy Food is very rich, so I doubt you will want to eat large amounts. This morning I had about a tablespoon of it with some plain soy yogurt and rolled oats. If you cook it down to a thick paste and then refrigerate, it will set up into a firm block, and you can cut it into cubes for snacks.

Wednesday, November 10, 2010

Vegan MoFo Day 10: Salteado


Today's recipe comes from The Cookbook for People Who Love Animals (1981). This book is already completely vegan, but I made a few recipe edits to suit myself.

Start by making their Quick Tomato Sauce:

2 T olive oil
4 cloves garlic, chopped
2 large onions, chopped
1 stalk celery, chopped
2 green bell peppers, chopped
1 t salt
1 t oregano
1 t garlic powder
1 t paprika
12 ripe tomatoes (or, in my case, four 14.5 oz cans of fire roasted tomatoes)
4 T tamari or soy sauce
2 T sorghum molasses
2 T arrowroot

Heat the oil, and add garlic, onions, celery, pepper and seasonings. Saute for 7-15 minutes, until everything is softened. Put the tomatoes in a blender with the tamari, sorghum, and arrowroot. You may have to do this in batches. Add to the pot, and simmer, uncovered, for an hour.

This makes more than you need, so you have extra for spaghetti or pizza. You could use jarred sauce, but this is quite tasty, and I LOVE that they use sorghum in it. Now, proceed to the salteado:

4 c tomato sauce (above)
1/4 c olive oil
1 small onion, diced (I left this out, as I felt there was already plenty of onion in the sauce)
1 c green peas
1 bay leaf
1/2 t granulated garlic
1/4 t basil
8 oz tofu, diced (I left this out - see below for my alternative)

Combine all ingredients, and simmer for 30 minutes. Remove bay leaf. Serve over boiled potatoes.

When making this, the idea of plain cubed tofu floating around in the salteado just didn't do it for me. I saw a recipe for tofu bacon on another Vegan MoFo blog, and decided that this would be a considerable improvement. I made a double batch of the tofu bacon, chopped it, and served it on top of (instead of stirred into) the salteado. Very nice.

While this was a bit complex, I definitely plan to make it again!


Tuesday, November 9, 2010

Vegan MoFo Day 9: The Protose Chronicles, Part I


Long before you could wander down to the local grocery and pick up tofu or tempeh, there was protose. Protose was/is a vegan protein food, usually based on beans and peanuts, which was sold canned, in different variations, by companies related to the Adventist church. It's not so common nowadays, so you have to resort to making your own. I found a recipe online, from an unnamed 1946 cookbook. With some tiny alterations from the linked original, here is what I tried:

1 c peanut butter (creamy, natural)
1 c mashed beans (I used canned, drained, red kidney beans)
2 c vegetable broth
2 T cornstarch
1 t granulated onion
1 t sage
1/2 t granulated garlic
1/2 t salt

Blend everything together until smooth. Pour into a greased double boiler, and steam for 3 hours.

The good news: it really does taste good. The bad news: it is far too mushy to chop up in a stew, or fry. The texture is basically that of cream cheese. I had some for breakfast on caraway bread, with a slice of tomato, broiled until hot, and thoroughly enjoyed it. I think it would make an excellent stand-in for refried beans in any Mexican-ish dish, and that is likely the fate of the remaining portion.

Seeing how liquid the batter was, I worried. And rightly so. To get a solid result, I think you would have to cut the liquid significantly (perhaps by half) and probably add more binder of some kind. I have noticed the presence of vital wheat gluten in some later homemade protose recipes, and vwg might be the path to firm-textured success, although it would sacrifice the gluten-free-ness.

Beyond future protose experimenting, this adventure has made me curious about adding peanut butter to refried beans and similar dishes.

Friday, November 5, 2010

Vegan MoFo Day 5: Millet - Pumpkin Seed Patties with Cashew Gravy


As many readers of this blog surely know, the Seventh-day Adventist Church encourages (but does not require) a vegan (or vegan + honey) diet. I have quite a few Adventist cookbooks, and you can check out currently available ones via the Adventist Book Center. One of my oldest Adventist books is Ten Talents by Rosalie and Frank Hurd, from 1968. It has been hard to find in the past, but is now back in print.

I wanted to try a recipe I've never made before, and picked the millet - pumpkin seed patties. These just happen to be soy-free, gluten-free, and completely delicious. We will definitely make them again.

4 c cooked millet
1 c cooked brown rice
1 c raw pumpkin seeds, ground fine
1/4 c cashew nuts, ground - or cashew butter
3 T oil
1 t salt
1 t onion powder
1 t sage

Mix everything together, form patties, and fry. These patties want to stick, so you need a well-seasoned or non-stick skillet, thoroughly heated, with enough oil. The Hurds say you can bake them, but I haven't tried that. They are nice and crispy on the outside, and creamy on the inside. You can sprinkle them with paprika if you want more color. The Hurds suggest serving the patties with their Cashew Milk Gravy, which is both easy and tasty:

2 c water
1/2 c cashew nuts
2 T arrowroot
2 t onion powder
2 T oil
1/2 t salt

Blend thoroughly until completely smooth. Cook in a saucepan over medium heat, whisking, until thick.

Thursday, October 9, 2008

Vegan MoFo Day 9: Product Review: Ancient Harvest Quinoa Flakes


This is our new favorite breakfast item. I bought it at the local Whole Foods, but it is widely available on-line, and can be bought in bulk from the manufacturer. The flakes are steam-rolled organic quinoa. It looks like tiny oatmeal, and cooks up super-fast into a smooth porridge with a light taste and gentle texture. According to the box, it can be used in baking, and for other purposes like thickening soups. We haven't gotten that far, yet. If you are a quinoa fan, you'll love it. And when you are enjoying your quinoa flakes with a splash of hemp milk, you can ponder just how far down the vegan rabbithole you have fallen!

Wednesday, October 8, 2008

Bonus MoFo: Pupusas

Pupusas are not beautiful food to begin with, and with the dark, cloudy evening here, all my efforts at a decent photograph failed miserably. I thought I had a good one of a pupusa in my hand, but when I downloaded it was blurry. So it goes.

I had leftover taco fillings (refried beans, corn relish, spinach, taco-spiced soy curls) from the other night, and lots of masa, so I decided to try my hand at pupusas. I love to order this wonderful Salvadoran food at Las Americas - they will make me a vegetarian-beans-only pupusa, and they are really nice about it. There is at least one other place nearby that makes them (Delicias Mary Chuy Restaurant) but I have not strayed from Las Americas.

There are apparently many ways to make a pupusa. After some internet research and watching the guys at Las Americas, here is what I did:

1. Mix masa harina with hot water from the tap until you have a soft but not sticky dough. Let rest for 30 minutes or more.

2. Pick up a golf-ball sized lump of masa, and hollow it out to make a cup. Put filling down in the cup, pull the sides around as far as you can, and then place a cap of masa on top to seal it.

3. Roll the ball around in your hands until it is smooth and sealed. Then gently flatten until it is 1/4 inch thick or a little more. If it breaks around the edge or filling pops through, just repair the best you can, and keep going. No worries - imperfections won't hurt. I found it easier to do most of the flattening in my hand and then finish on a plate.

4. Place in a hot skillet and fry on both sides until done. A dry skillet was recommended in a number of sources, but I saw someone on YouTube use just a wee bit of oil, so I did that. I think it was a good idea.

5. Eat! Tomato salsa and a cabbage/carrot slaw are the usual sides. We had the salsa but not the slaw, because I am lazy. You need the tomato salsa to point up the flavor, especially if the fillings are mild. When I make these again, I think I'll experiment with adding a little salt and/or seasonings to the masa.

Monday, October 6, 2008

Vegan MoFo Day 7: DIY Tortillas


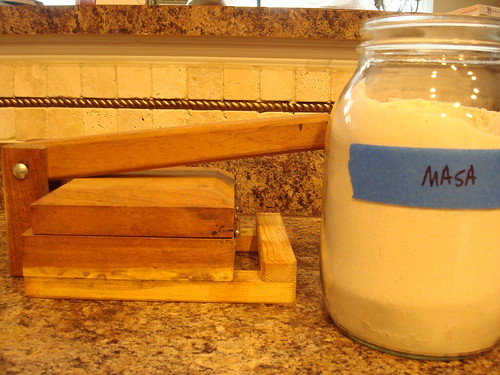
The DIY task appointed by Morgyn at The PPK forums for this week is tortillas. I bought a press yesterday (inexpensive, and worked like a charm), and already had masa harina and water (the only ingredients) on hand.

I followed Rick Bayless' instructions from Authentic Mexican, which are very detailed and helpful. A couple of notes, though - He said the masa should be like soft cookie dough. Mine was too wet at first, and I had to adjust. Also, he mentions using thick plastic on the press, but offers no explanation of where to obtain such. A little internet exploration revealed that one can cut squares from a freezer bag - and they are durable enough to wipe off, keep, and re-use. (If you are trying to avoid plastic, waxed paper works, too, although you don't get many uses from a sheet. I tried both waxed paper and the freezer bag pieces.)

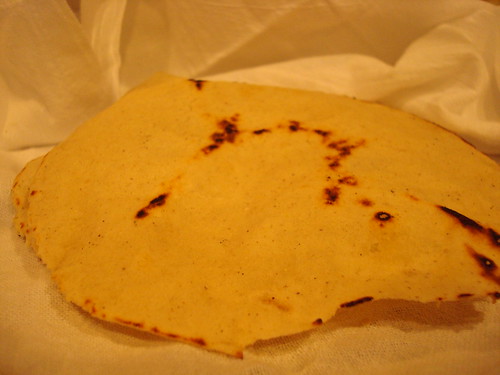
Condensed instructions: Mix masa harina with hot water from the tap until you have a soft but entirely non-sticky dough. Cover and let rest for 30 minutes or more. Place one iron skillet on medium-low heat, and one on medium-high. (No oil. Both skillets are dry.) Use your tortilla press to make a tortilla: Press a walnut-sized ball of masa in-between sheets of plastic or waxed paper, turn 180 degrees, press again, and peel off into your hand. Drop the raw tortilla in the medium low skillet for 20 seconds or so, then flip into the hot skillet for another 20 seconds, then (still in the hot skillet), turn over for a final 20 seconds. It should puff up like a pita (it does, it does!). Wrap the finished tortillas in a kitchen towel, while you continue working.

Having made these once, I have a much better sense of the proper dough consistency, timing, how hot the skillets should be, and so on. It's really easy once you get the hang of it, and if my first tortillas are not so pretty, that's a sacrifice I'm happy to make for the education. Much like yeast bread, there is a tactile learning process here - you have to get your hands in the masa to understand it.

Results: SO much better than the tortillas in the store. I don't think I can buy the pre-made anymore. It's a whole different world. We had them with Soy Curls cooked with taco seasonings, baby spinach, and Cahill Desert Corn Relish (another crazy-delicious swap package score from ViT).

Go make tortillas!